
| Car: | Ford | Fiesta | CX (Mk3) | XR2i | Hatchback |
| Engine: | Zetec-E | 1988 | Inline 4 | (Series 2) | N/A | Petrol |
2.0 16v Zetec-E series 2 conversion
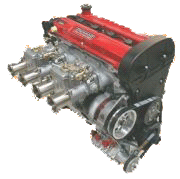
I am going to do some work on the engine in the near future, The engine runs beautifully as standard and I wouldn't want to upset the running in any way. I am looking in to turbo charging it in the near future, as I don't want the poor running qualities associated with highly tuned N/A engines. The most cost effective way of tuning, keeping the engine naturally aspirated, was going to be two 45mm Webber carburettors (see right photo). These would in place of the standard EEC-IV injection setup. The Webbers would raise Hp from 137 to 165. This will not be feasible on my car as exhaust emission parameters would be shot out of all proportion, meaning a failed MOT.
For the time being the engine itself will be mainly standard, to get me on the road and to ensure everything is bed-in.
I will concentrate mainly on cleaning the engine, and getting parts re-plated or coated. I also intend to replace all easily accessible gaskets and seals. I should not have a great deal of work to do in this area, the engine being only 2 years/28k miles old, it is already in good condition.
Conversion from Mondeo to Fiesta specification
Before I could start having parts plated and powder coated I had to disassemble the engine to its bare form, removing brackets, thermostat housings etc.. There is quite a list of parts that require swapping for Fiesta items, although all simple tasks I dread to think what it would have cost if I didn't have a Fiesta Zetec engine to start with! Below is a table comparing each Mondeo part to the relevant part on the 1800 Zetec engine that was originally fitted into the car:
| Mondeo Part | Difference to Fiesta | Problems caused | Solution |
| Inlet manifold | Totally different design, much larger | Fouls brake link bar on bulkhead | |
| Throttle body | Throttle cable fixings | Fiesta cable will not operate Mondeo t/b | Direct swap |
| Sump | Design | Fouls exhaust manifold | Direct swap |
| Oil pick up pipe | Different length and angle | Fouls inside Fiesta sump | Direct swap |
| Water pump | Spout aims out in different direction | Fouls Fiesta mounting bracket | Direct swap |
| Exhaust manifold | Design, EGR take-off point | Incompatible with Fiesta system | Direct swap |
| Dipstick tube | Vertical tube, Fiesta is shaped | Fiesta has angled tube to clear mounting brackets | Direct swap |
| Starter motor | Fixed to opposite face of engine | Fiesta gearbox has hole on opposite side | Direct swap |
| Alternator | Fixed to opposite face of engine | No room at rear of engine in Fiesta | Fit Fiesta Engine brackets |
| Mounts | Design | Just wouldn't work !! | Fit Fiesta Engine brackets |
| Temperature sensors | Different connectors | Don't fit the Fiesta loom | Direct swap |
| Water pump pulleys | Operated by flat side of belt | Operated by ribbed side of belt | Direct swap |
| Oil Pump | Filter points horizontally out from engine. | Filter fouls wishbone mounting point. | 2 |
1 Injection setup
This is a potentially difficult part of the conversion. I could easily swap the Throttle body, injectors and fuel pressure valve across from the Plastic Mondeo unit to the alloy Fiesta unit. This is all just a direct swap but leaves the problem of port size, the Fiesta having much smaller ports - this would restrict the engine significantly defeating the point of the whole project in the first place!
The problem with the Mondeo injection system is that instead of curving upwards from the inlet ports it curves downwards behind the engine, and runs very close to the brake link bar. I have taken a few measurements and it will just physically fit - but I doubt clearance would be maintained under acceleration or during start up:
I have two options available to me:
- Get the Fiesta alloy manifold machined to match the 2000 inlet ports (tolerances permitting).
- Modify the Mondeo manifold using plastic welding techniques.
After some thought I have decided to take the relatively easy life, and use the Fiesta setup!
2 Oil pump
The oil filter take-off on the Fiesta is angled a few degrees towards the gearbox side of the engine to clear a chassis member. The Mondeo take off points straight out. I could have swapped the oil pumps over to cure this problem but the Mondeo one has only done 28,000 miles as apposed to my Fiesta which has done 44,000 (The Mondeo engine looks like it has been treated to much better oil and regular changes, as apposed to the Fiesta which looked varnished inside). I was also worried about a lack of pressure and capacity from the 1.8 pump. I am going to see if a half size filter will fit, if not I will have to install a filter relocation kit.
Swapping the sumps and oil pick-up pipe over is a simple task, but take note - Ford recommends using special sealant in all four corners to aid the seal where the block meets the crankshaft caps. (I noticed this sealant when removing both Fiesta and Mondeo sumps).
Engine anatomy
Once all ancillaries are removed from the alloy Fiesta manifold it comprises of two basic parts - the main manifold and a thick sandwich plate in-between this and the cylinder head. I did some research to find out part numbers, it turns out that the alloy manifold is the same for the RS1800 and XR2i, but the 3" sandwich plate in-between this and the head is different (larger ports). I decided to leave the manifold as it is, and match the sandwich plate to the 2000 head.
I used a 2000 inlet manifold gasket to accurately scribe the ports onto the XR2i sandwich plate - there is quite a difference, a good 6mm extra in diameter. I used an electric tool with die grinding attachments to taper the port out smoothly to match the 2000 size, this was straight forward enough with more than enough 'waste' metal surrounding the ports. Once I finished the grinding stage I used gradually finer grades of emery paper to remove any slight lumps and leave the surfaces slightly polished.
Reassembly is straight forward, using all new gaskets and seals for the injectors. I took the chance to have all the nuts and bolts re-plated. The Mondeo fuel rail swaps straight across onto the Fiesta inlet manifold, and although I could have kept the Fiesta fuel rail with the correct pipes, I chose the Mondeo one due to the fact the fuel pipe unions have extra o-rings to cope with 2-litre fuel pressure. The throttle bodies require some modification to cross over from Mondeo to Fiesta, although all machined from the same casting the Mondeo uses different throttle cable fixings to the Fiesta.
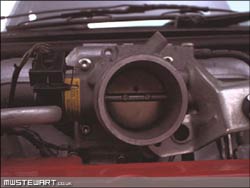
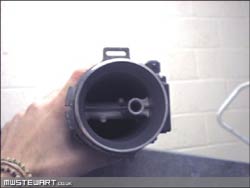
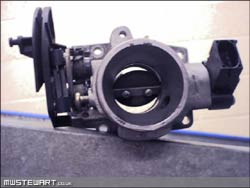
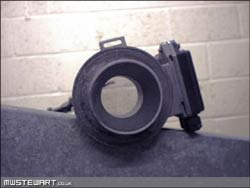
All that is required for the conversion is to dissemble the throttle butterfly actuating mechanisms on both parts and swap them over, this is all necessary because the Mondeo throttle body has a larger opening which lets more air pass to feed the increased engine capacity.
These photos show the difference in internal diameter of 1800 and 2000 throttle bodies and Mass airflow sensors (2000 top, 1800 below)
Important note - Automatic transmission donor engines!
Mondeo engines which were fitted with the automatic gearbox were fitted with different Crank Position Sensors. Before you can run your engine with a manual Mondeo ECU or any of the fiesta ones the CPS along with its alloy mounting bracket MUST be swapped for your standard fiesta one or a manual gearbox Mondeo version. If you do not do this you will suffer poor high RPM performance or at worst the engine will fail to start.
Restoration
To start with I stripped away both manifolds, EGR (Exhaust Gas Return) pipes, PCV (Positive Crankcase Ventilation) valve etc to get good access to the engine. The block was sound although rust had started to spread out underneath the protective coating from around some machined faces, mainly on the exposed 'front' of the engine. I sanded down these areas, primed them and painted the whole block in gloss black Hammerite (masking of core plugs etc.) To maintain the factory look I also highlighted the machined faces in silver.
With all the accessories off I could get to work cleaning everything with a paraffin spray gun. Any alloy parts (like belt tensioners) I polished myself. I had the PCV valve, Sump, Cam cover, hoisting eyes and all non-damped pulleys powder coated. The main accessory pulley on the end of the crankshaft is vibration damped with a rubber insert, so I had to make do with painting this myself. Before refitting all the components I polished the alloy head and any other exposed alloy parts.
Before I proceeded to refit the thermostat housing, PCV valve etc. I ordered a complete (when I say complete I mean minus head gasket) from Ford including rubber o-rings for the thermostat, and sump plug gasket etc. I thought about replacing the core plugs too but they looked excellent. Once every thing was in place I renewed the timing belt for peace of mind. As it was the first time this had been done since the factory, I had to obtain a spring and bolt assembly from Ford.
Gearbox
For the mileage and age the gearbox was in a somewhat scruffy state! The only real preparation needed was a good clean. The alloy casting is very hard to clean using convention methods such as scrubbing with paraffin etc. To get around this I used the acid out of an old lorry battery. This sounds like a very strange thing to do, but applying the acid with an old paint brush attacks the surface and removes the engrimed dirt. After 15 minutes or so it can be hosed down - and what good results it gives!
The end plate was slightly tatty so I had this powder coated in silver, this went back on with a new gasket. I replaced all the bolts with stainless steel and filled the 'box with new, high quality, oil. A new Ford release bearing was also fitted at this stage.
The gearbox was a straightforward installation along with the engine, the real fun occurs trying to fit the Puma gear linkage! The unit is very different from a standard Mk3 Fiesta linkage, as the bottom left photo shows - the steady rod is on the opposite side to the fiesta and clearly the mounting system differs from XR2i to Puma.
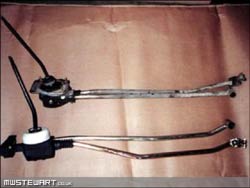
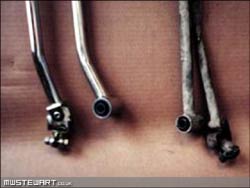
The right photo clearly shows the how the two linkages fix on opposite sides - although this proved to be the least of my worries!
The major problem lies with the neutral-return spring, it is in the gearbox housing on the Puma, as apposed to the Mk3/4 Fiesta which has it on the gear linkage. The unit itself required 2 holes to be drilled in the floor pan for the mounting bracket, but this was straightforward enough. I used sealer and stainless bolts for added corrosion resistance.
The next problem was to design a return spring arrangement. In the end I decided to drill the floor and have 2 bolts sticking up parallel to the gear stick in the neutral position. From these bolts I had a spring going to the gear stick - any bias to a particular side can be countered by moving the spring up and down the bolts (spring has less effect towards the base of the gear stick) and clamping with nuts either side.
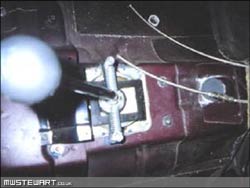
This was perfect in theory but I found the metal was not thick enough around the bolts on the floor, and when the springs were fitted the metal flexed loosing any tension in the springs. To get around this I designed a strengthening plate to fix between the 2 bolts, going over the gear stick itself.
Right - The neutral spring assembly in place, gear stick with Puma gear knob. (braided hoses are the oil and fuel pressure gauge lines)
© Mark Stewart, Friday 15th June 2001
![[XML RSS Feed]](/images/xml/xml_rss.jpg)